Brake Service Part 1 - Changing the Fluid
There are numerous aspects to servicing the brakes but this discussion will focus on changing the hydraulic fluid. Although the focus here is on your dirt bike, what is presented here will pretty much apply to all of your fleet, 2 and 4 wheels.
WARNINGS
- Brakes are a basic safety item and although not difficult to work on, get it wrong and the outcome could be painful. If in doubt seek professional advice.
- Brake fluid is also toxic so basic safety procedures apply. Keep it out of you and off you. Consider wearing gloves when doing this stuff.
- Brake fluid is corrosive to some materials and works great as a paint stripper. Get it on any painted surface and leave it for too long and it'll get ugly. Clean down any spills ASAP with water or aerosol brake cleaner, which is also toxic and corrosive itself..
- If you get in a mess, methylated spirits is good for cleaning up brake stuff and is also hygroscopic, which is good as it gets rid of moisture before we introduce brake fluid.
Brake fluid needs to be changed every 2 years. This will be in your manual and is recommended by the fluid manufactures too, although with a vested interest, I guess you would expect that anyway. Why? Brake fluid, at least the non DOT 5 silicone stuff, which is generally not recommended (DOT = US Department of Transportation specification), is hygroscopic which means that over time it absorbs water. Water in the fluid when hot creates gas bubbles, which are compressible and result in spongy levers, and the water is also a catalyst for corrosion so the internals of the brakes deteriorate affecting their performance and longevity too.
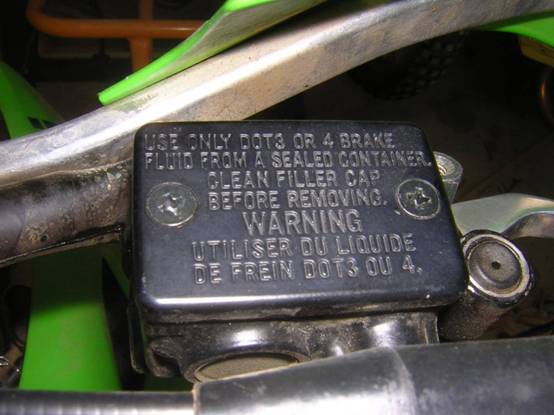
Some basic instructions appear on the master cylinder cap of some bikes such as this Kawasaki example. WARNING, use only DOT3 or DOT4 brake fluid from a sealed container. Clean filler cap before removing.
Cleanliness is all important, we do not want any contamination inside. A spec of dirt can cause problems with seals and small passages inside the system and we want to avoid it. A sealed container assists in this too, and also means that the fluid hasn't been exposed to air allowing it to start absorbing moisture.
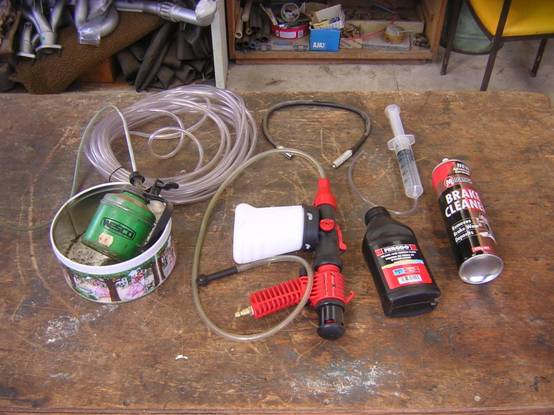
What do we need to do the job then, other than some fresh fluid? Well not everything in this picture, but at least some of it. From left to right we have:
- An old style oil can that has only ever had brake fluid in it. Its ideal for reverse bleeding cantankerous brakes, and clutches too for that matter, if you have one that runs brake fluid.
- Some nylon tube sized to fit over the end of a brake bleed nipple. You won’t need this much, but get a few metres because its handy stuff for other things.
- In the middle, a favourite is a vacuum bleeder that needs an air compressor to function, it'll suck the fluid through.
- Above is a one way valve and some tube which can be purchased from most auto parts places as one man bleeder.
- Next is a fresh bottle of brake fluid. I generally use DOT4, although DOT5.1 is supposed to be better again. Its not DOT5 mentioned above, and is OK. I also keep a few different brands because they are different colours and it makes it easy to see when fresh, new, fluid is coming through.
- A syringe, of which I have few in the shed. Great for sucking stuff up, and squirting it out too. You can get these for not much from your local pharmacy (or even cheaper at the hospital skip). Use them for setting fork oil levels, sucking excess oil out of your engine, flushing solvent through a carb etc.
- A can of aerosol brake cleaner which is handy for cleaning up, although perhaps not the most environmentally sensitive solution. It can be expensive but if you negotiate with your local auto parts place you should be able to get the Motortech brand picture here for about $3 a can if you get a box of a dozen.
- Missing is some rags, a suitable ring spanner to fit your bleed nipple and any tools you need to get at and remove the brake fluid reservoir cover.
Before we get into it, its now time to remind ourselves of what the lever 'feels' like from beside the bike. When we squeeze, where does it start to get hard. This is a useful reference, when we finish we want it to be at least as good.
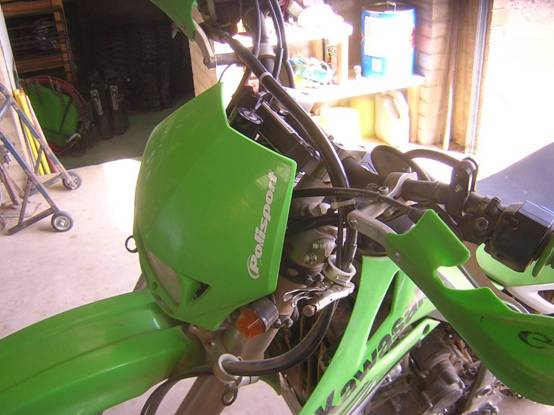
Something to consider before commencing any bleeding is where the high spots in the system are. On this Kawasaki, like many dirt bikes, the front brake hose runs up from the master cylinder before finding its way down the fork leg to the calliper. The high spots are where air accumulates and our objective is to set it up so that the master cylinder reservoir is the highest spot in the system, allowing air to escape rather than be trapped. To achieve this on this Kawasaki, with the bike on the sidestand, the bars are turned left and a small vicegrips are clamped gently to the brake hose under the top guide. Notice the 'S' bend in the hose that results below, and that the cylinder reservoir is now the high spot as desired.
This objective can be achieved in different ways, depending on the specifics of your bike. The most extreme example would be removing the master cylinder from the handlebars. If doing this it can be convenient to attach it to a spare set of bars (you knew you kept that old bent set for a reason!) which you can then clamp/attach to something.
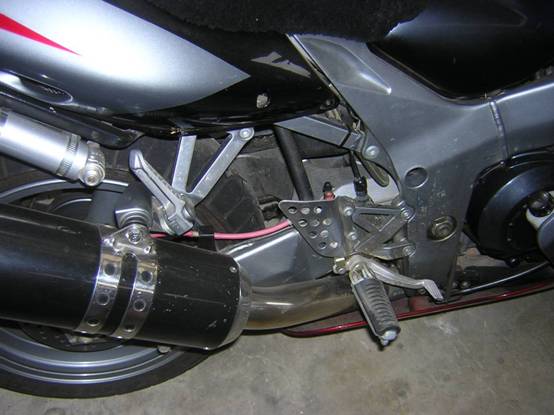
In the picture below of my road bike, if you look closely, you can see that when I fitted a braided hose I also fitted a bleed nipple where it attaches to the master cylinder, which happens to be the highest spot on this system, and makes getting any trapped air out far simpler than it used to be. Just bleed twice, once from this nipple and than at the calliper.
If you haven't already, clean around the master cylinder reservoir and remove the cap.

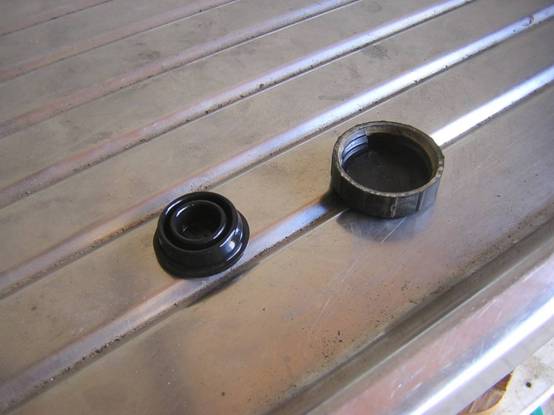
Under the cap you'll find a rubber gasket/seal "thingy". Their purpose is to separate the brake fluid from air. Note the differences in the before and after pictures of the rear brake cap and seal from the KLX.. Note that the seals are expandable. The idea is that as the pads wear and the fluid drains down into the calliper to compensate, air that comes into the system stays on top of the seal and seal expands, following the fluid surface down into the reservoir, maintaining the separation. Before reassembly, make sure the seal is fully compressed like in the second photo.

When bleeding fresh new fluid into the system we generally do it from top to bottom. This normally means that all the old fluid in the reservoir gets flushed through too. Avoid this by using the syringe to suck out most of the fluid and any grot first. And if we were to reverse flush, ie bottom to top, then we’d have no choice, as we need to make space for the fresh fluid coming up.
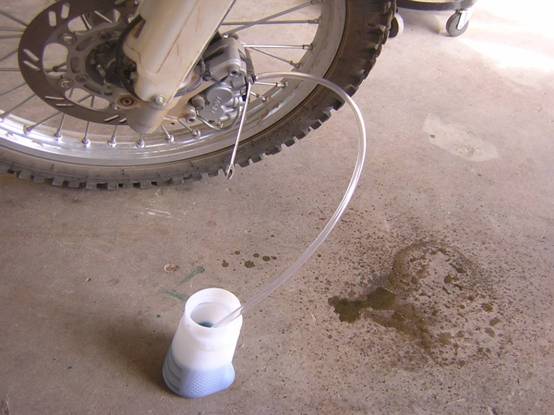
This photo shows the classic bleeding process. Having drained the reservoir and topped it up with fresh fluid, we now attach a ring spanner to the bleed nipple and a hose draining into a suitable container. The process can be undertaken by one person, although two can be simpler if you can get the coordination happening. It's a bit like CPR.
- Crack bleed nipple by up to half a turn, 180 deg or so.
- Slowly squeeze the lever in fully and hold completely compressed
- Fluid should now be coming out of the tube
- While lever is fully compressed, close the bleed nipple
- Slowly release the lever
- Fluid should now flow from the reservoir into the system to replace that which just went down the hose
- Repeat the cycle until the fluid is all the same colour as the new stuff you put in at the top
- You'll usually get a little air initially as it can accumulate at the high spot in the calliper which is under the nipple
- You may get some fluid come out around the nipple threads, clean it up as you go, keep it off the brake disc too as its slippery
- Don't forget to top up the reservoir
- If it drains you'll get air in the system and need to do some more flushing
- When you have all fresh fluid and no air bubbles, bleeding is done.
- Get the fluid level set correctly in the reservoir, using the full level indicator mark. Refit seal and cap
- Now check
- The 'feel' and confirm its at least as good as when we started, remember that we checking this first!
- Confirm that the lever holds pressure and doesn't eventually bottom out. If it does, there is a leak, so look closely
if you have a 'one man bleeder' then closing the bleed nipple is unnecessary in the above cycle, as the one way valve does the job automatically for you. Means that all you have to do is squeeze the lever in and out.
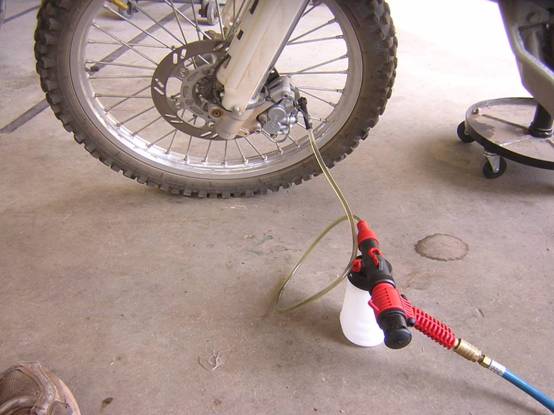
A vacuum bleeder is an easy way, but more expensive because you need an air compressor as well as the bleeder. It can help getting some stubborn air out and definitely makes it a one person job, especially the 4 wheelers. Be aware that when sucking fluid through, that air can be sucked in from around the nipple threads and it can look like there is lots of air in the system when there is not..
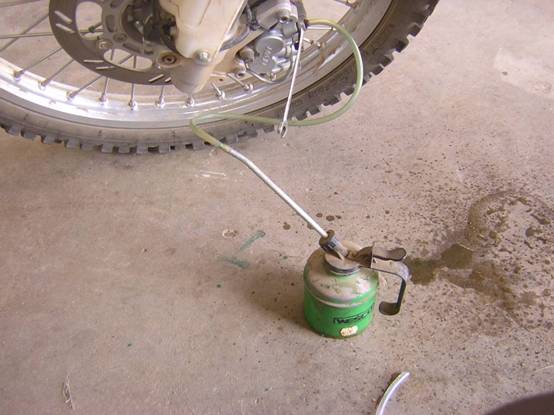
Sometimes the only way to get a stubborn air blockage out is a reverse bleed, pumping fluid in from the calliper. Remember to keep draining off the fluid from the reservoir before it overflows.
Remember:
- Use fresh fluid from a sealed container
- Cleanliness is essential
- Get the air out of the system
- Check for leaks and lever feel before test riding
- Dispose of the waste fluid carefully. I add it to my waste oil container that goes to the tip for recycling.
If it all goes smoothly it shouldn't take more than about 5-10 minutes a brake and one bottle of fluid should do a few bikes, so might as well do the fleet at the one time.
If its your first time, allow and hour and take your time checking each step to get it right.
Keep a log, or just mark the calendar, up so that you know when 2 years has expired and its time to do it again.